Call of Duty®: Vanguard „Shi no Numa“ Easter Egg Guide
DIE KARTE

To complete the Easter Egg on Shi No Numa, you must have the Wunderwaffe DG-2.
The Wunderwaffe is located on a workbench in Storage, but you will need to find parts to build it first.
The Wunderwaffe can also be obtained from the Mystery Box, but this is not recommended, as the Wunderwaffe will only appear in the Mystery Box starting from round 10.
First, you need to pay 1,000 Essence Points from your starting area in the upper part of the main hut to open the stairs leading to the lower part of the building. The next gate you should open is the one that leads from the Hunting Hut to the Doctor’s Quarters. This unlocks the area you will need for step 2 in round five. After completing round five, you should have enough points to open more sections of the map and build the Wunderwaffe. The next gate you want to open is the one in front of the main hut near the large Flogger trap. Pay 1,000 Essence Points to unlock the path that leads to the Fishing Hut.

Credit: Gamespot.com
Once you arrive at the Fishing Hut, you will find a barrel on a shelf inside. The part is located on the right side of the building.
It’s easy to spot, as it is marked in yellow.
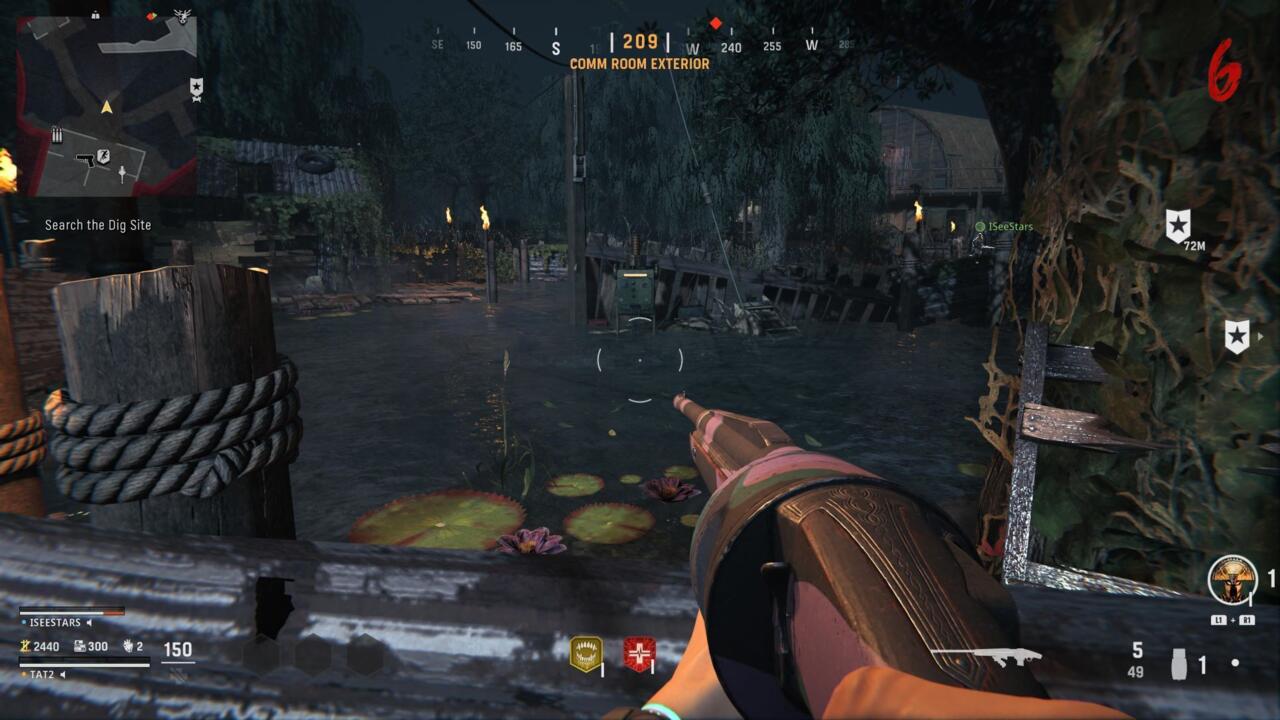
Once you’ve picked up the part, head to the northern part of the map. In the water, there is a green power box directly in front of the Comm Room. Interact with the box to place the part in it. Afterward, it’s your duty to complete the round.

Credit: Gamespot.com
A lightning bolt will strike the box, starting a familiar defense wave of zombies. Be cautious, as zombies with miniguns will spawn as well! Once you survive the wave, you can pick up the part again.
Now, head to the Comm Room to collect the charged vacuum tube from the radio.
The third and final part is an electrical fuse. This can be found on a desk in the office. Grab the fuse and take it to the Storage Hut.
Inside the hut, there is an electrical trap that can be activated. Do just that, and you will notice that the device breaks and informs you that it needs a new fuse for repair.
We’ve already picked up this exact fuse earlier, and now you can place it in the device. Once the fuse is placed, you can reactivate the trap.
After enough zombies are killed by the trap, you’ll get an audio cue.
With this step, a second vacuum tube is charged, which is already on the workbench and doesn’t need to be charged.
For the final part, you’ll need the help of an enemy—specifically, Zaballa. However, she won’t spawn until after round 15.
Once you reach round 15, Zaballa will appear. Lure her into the Dig Site. In this room, there is a large Tesla coil that needs to be charged. This is where Zaballa comes in.
Try not to kill her right away. Instead, lure her into the room with the Tesla coil, as mentioned. Using her attacks, you can charge the coil. Stand in front of it and wait until she is about to attack, then quickly move away. Once her electric shots explode near the Tesla coil, it will charge up.
Credit: Gamespot
Once the Tesla coil is fully charged, you will get another audio cue. You can now pick up the final missing part and go to the Storage Room to collect the Wonderweapon.

Quelle: Gamespot.com
Head to the outside area of the Doctor’s Quarters to find a monolith covered in vines.
With the help of Boom Schreiers (the red glowing and exploding zombies), you can remove the vines. To do this, kill the explosive enemies right next to the monolith.
Once you’ve caused enough Schreiers to explode near the monolith, you will receive a new audio cue.
The Schreiers first spawn in round 5, making this the best opportunity to free the monolith from the vines. The higher you progress in rounds, the harder it will be to deal with the Schreiers.
Now, head to the Doctor’s Quarters and look for a piece of paper with symbols that resemble Asian characters.
However, the paper only shows half of the symbols. Using a Molotov cocktail or Thermite, you can reveal the rest of the letters or symbols.

Credit: Gamespot.com
These symbols must be entered into the monolith. However, before this can be done, three rings must be found that need to be inserted into the monolith.
You can find these three rings at the following locations:
- In the room farthest to the right in the Doctor’s quarters.
- On a table in the dormitory located in the basement of the main hut.
- On a table directly in front of the Pack-a-Punch machine at the excavation site.
Now insert these three rings into the monolith. Next, a code must be entered, and we need one symbol for each ring.
Using the step you previously completed with the sheet, we can determine the symbols that must be entered into the monolith.
Now grab a pen and paper to record the symbols you find.
The symbols change with every game. This step MUST be completed in every game!
You can find the symbols at the following locations:
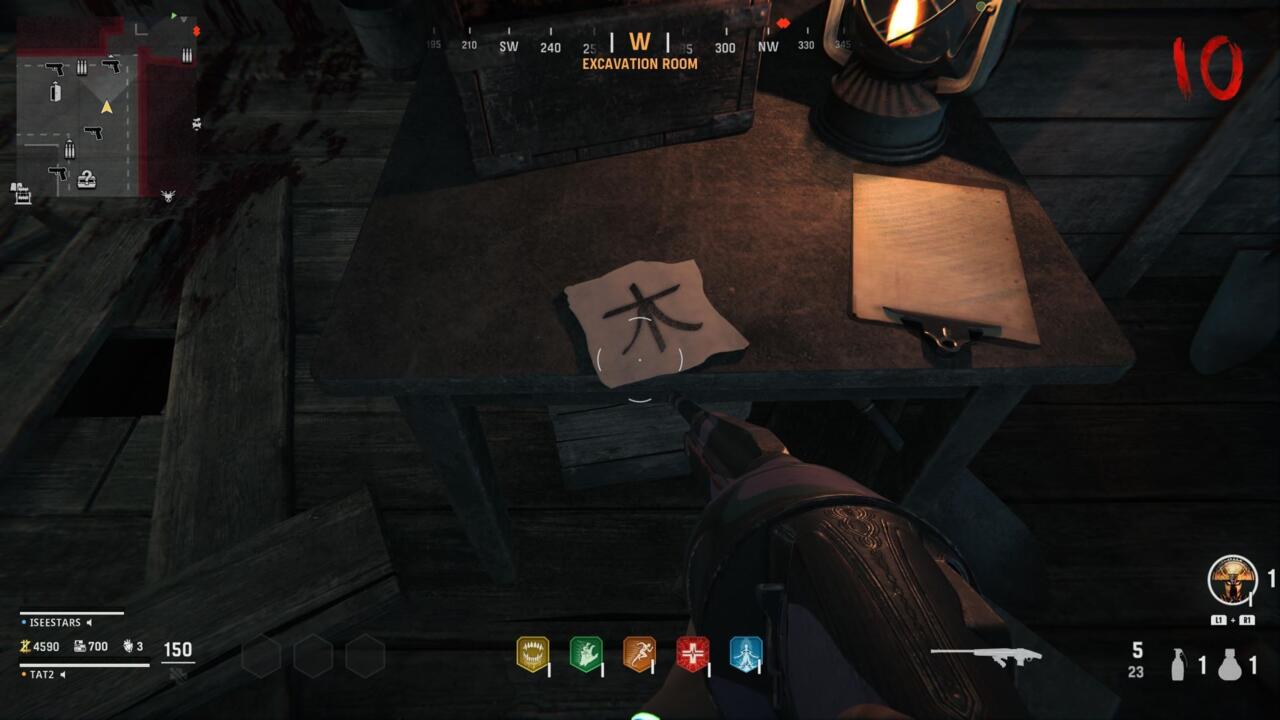
- On a table in the lower area of the excavation room in the main hut.
- On a table with radios in the communication room.
- On the crafting table at the excavation site.

Credit: Gamespot.com
Note that symbols can also be covered by a blank sheet of paper. Just shoot at it to reveal the symbol.
IMPORTANT: To complete the next step, you will need the wonder weapon. Without it, you will not be able to finish the next step, and the main quest will fail, forcing you to start over!
Once you have transformed the symbols using the overview you found in the Doctor’s quarters, you can enter the correct code into the monolith.

Credit: Gamespot.com
The symbols must be entered at the 12 o’clock position. While you are doing this, you will not be attacked by zombies.
If you have entered the code correctly, you will notice that another audio passage plays, and you will be “trapped” in that area.
NOTE: THE WONDER WEAPON IS REQUIRED FOR THIS STEP!
Complete this step as quickly as possible. Make sure you have your weapons upgraded and are in possession of your perks.
Once the code has been entered into the monolith, other stones will begin to glow red.
Note: Only as many stones will start to glow as there are players!
Now, you must interact with all the stones simultaneously. This will trap you in that area.

Credit: Gamespot.com
A wave of zombies will begin to attack you. Whether you are playing alone or in a team, and regardless of who possesses the wonder weapon, that person must shoot the zombies surrounded by blue smoke with the wonder weapon. Beware, these zombies are more aggressive and faster than the others. Players without the wonder weapon should focus on eliminating the zombies without smoke, making it easier for the wonder weapon holder to deal with the others. Also, make sure that the zombies with blue smoke are killed near the monolith.
This task will become harder with each round. If you fail, you can try again in the next round.
Opposite the Flogger trap, you will find a broken perk fountain. So gather a horde of zombies and go through the Flogger trap with them. Kills with this trap will fill the fountain with “Flogger juice.” Drink from this juice to gain a special view.

Credits: Gamespot.com
Now, using the enhanced vision, you must find two mirror pieces. These can be floating in or around one of the buildings on the map. They are easy to spot because they glow brightly in the air. Somewhere on the map, you will also find a red orb, which will lead you directly to one of the mirror pieces.
If time runs out and the enhanced vision disappears, you can repeat this step at any time. You simply need to kill more zombies with the Flogger trap to refill the fountain with juice again.
Take the two mirror pieces and bring them to the excavation site. Interact with the pedestal in the center to place the pieces. Now, glowing orbs will appear (one orb per player).

Credit: Gamespot.com
Each player must approach an orb, and all must interact with their orb simultaneously. Afterward, the orbs will float away. It is now the task to follow these orbs (each player their own) and shoot them three times. After being hit, the orb will fly to a new location. Repeat this process until you have hit it three times. If the task is not completed, you will have to wait for the next round.
Once this step is completed, you can interact with the pedestal again. However, the boss battle will now begin.
Tip: Make sure you have your perks and that your weapons are appropriately upgraded.
The boss fight lasts for three rounds. The final boss will be immune to your shots until certain points in the final battle.
The first round behaves the same as the task in Part 4. Again, shoot the zombies with the blue smoke using the wonder weapon. However, instead of in front of the monolith, you must kill the zombies near the pedestal.
After completing this step, a blue bubble will surround the area. Make sure the boss is standing in this bubble. He will no longer be immune to your weapons there. Attack him until he becomes immune to your shots again. This is also the point where the second round of the final battle begins.
Round 2 works similarly to the previous round, except that instead of blue zombies, red screamers will appear. These must also be killed in close proximity to the pedestal using the wonder weapon. Once you have eliminated enough of these screamers, the blue bubble will appear again, and the boss can be attacked once more.
In Round 3, enemies with miniguns and blue zombies will appear, which must again be killed with the wonder weapon. Once the blue bubble appears again, eliminate the final boss.
Congratulations, you have completed the Easter Egg!

